Loaded Nacho Cheese Potato Skins Irresistible Snack

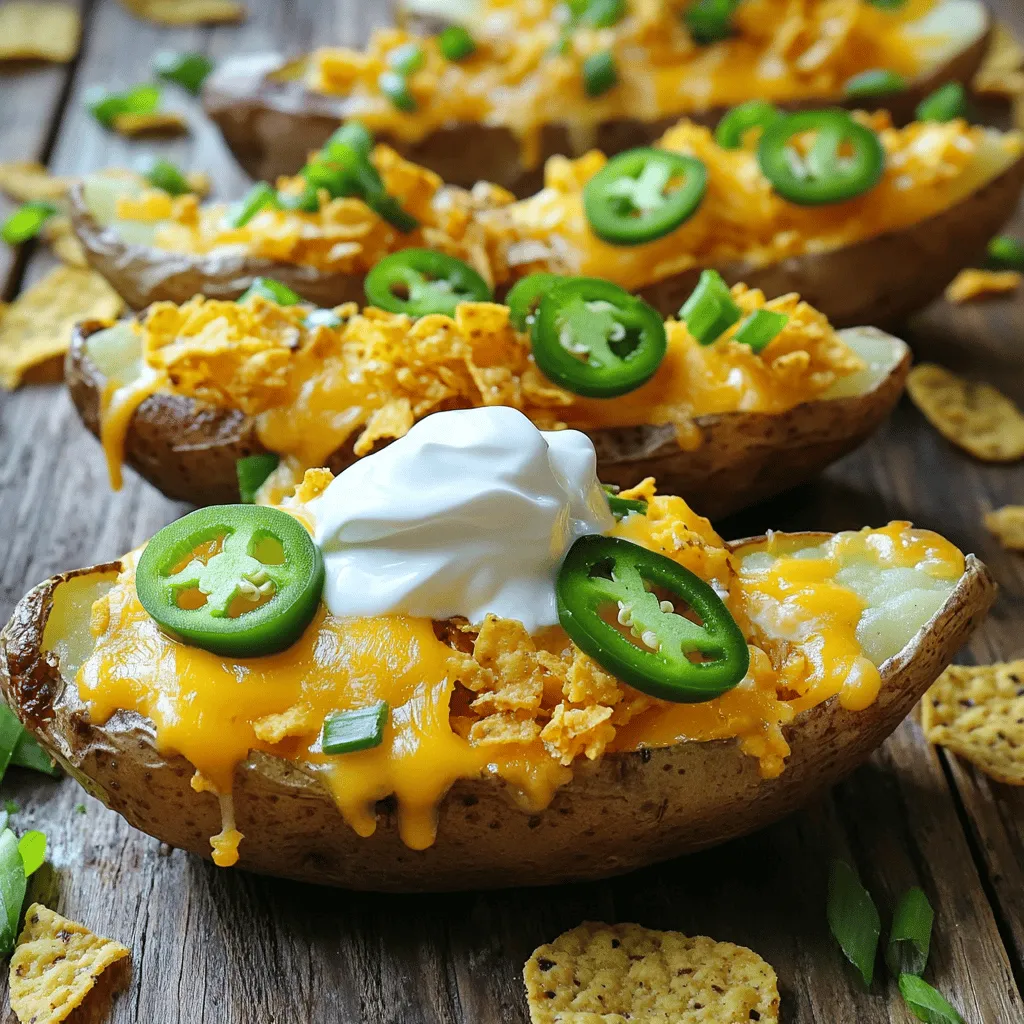
If you crave a snack that’s fun and full of flavor, you’ll love Loaded Nacho Cheese Potato Skins! These cheesy, crispy bites are perfect for game day or any gathering. With a handful of simple ingredients, you’ll learn how to turn regular potatoes into a tasty treat. Get ready to dive into this delicious recipe that combines gooey cheese, spicy jalapeños, and crispy skins. Ready to impress your taste buds? Let’s get started!

- 4 large russet potatoes - 1 cup shredded cheddar cheese - 1 cup shredded Monterey Jack cheese - 1/2 cup sour cream - 1/2 cup sliced jalapeños (pickled or fresh) - 1/4 cup chopped green onions - 1/2 teaspoon garlic powder - 1/2 teaspoon smoked paprika - Salt and pepper to taste - Olive oil for brushing - Crumbled tortilla chips (for garnish) The key to great loaded nacho cheese potato skins lies in fresh ingredients. Start with large russet potatoes. They have a thick skin, perfect for holding toppings. Use a mix of cheddar and Monterey Jack cheeses. Cheddar gives sharpness, while Monterey Jack melts beautifully. Sliced jalapeños add heat and flavor. Choose pickled for tanginess or fresh for more spice. Don't skip sour cream; it cools the heat from the jalapeños. Green onions add color and a fresh taste. The garlic powder and smoked paprika will deepen the flavor. Finally, season with salt and pepper. Brush the skins with olive oil for extra crispness. Crumbled tortilla chips on top provide a nice crunch. With these ingredients, your potato skins will be loaded with flavor and texture. - Preheat the oven to 400°F (200°C). - Scrub and prepare the russet potatoes. This helps remove dirt and makes them ready for baking. - Bake the potatoes until tender. This usually takes about 45-60 minutes. - Cool and cut the potatoes lengthwise. Wait until they are cool enough to handle safely. - Scoop out the potato flesh, leaving a 1/4-inch border. You can save the flesh for mashed potatoes or soups. - Brush the skins with olive oil. Sprinkle salt, pepper, garlic powder, and smoked paprika on top. This adds great flavor. - Layer the skins with shredded cheddar cheese first. Next, add Monterey Jack cheese and jalapeños. - Bake the loaded skins for 5-7 more minutes until the cheese is melted and bubbly. This step brings everything together. - Top each skin with a dollop of sour cream. Add chopped green onions and a sprinkle of crumbled tortilla chips for crunch. Enjoy each bite warm and full of flavor! To get crispy potato skins, start with the right baking technique. First, bake the russet potatoes at 400°F (200°C). This high heat helps them crisp up nicely. Pierce each potato with a fork. This allows steam to escape and prevents sogginess. After baking, let them cool slightly. Then, scoop out the flesh, leaving a thin layer. Brush the skins with olive oil for added crispiness. Season with salt, pepper, garlic powder, and smoked paprika. Proper seasoning is crucial; it enhances the flavor of the skins. When it comes to cheese, I love using a mix for great flavor. Cheddar and Monterey Jack are a classic combo. Cheddar adds sharpness, while Monterey Jack melts beautifully. You can also try pepper jack for a spicy kick. If you want alternatives, consider gouda or fontina. These cheeses melt well and add unique flavors. Mixing cheeses gives your loaded nacho cheese potato skins depth and excitement. Many people overcook the potatoes. This can lead to mushy skins. Bake them just until tender, not falling apart. Also, don’t skip the seasoning. Without enough salt and spices, your skins can taste bland. So, taste as you go! A little extra seasoning can make a big difference in flavor. Pay attention to these tips to enjoy perfect loaded nacho cheese potato skins every time! {{image_2}} For a tasty vegetarian twist, try adding fresh veggies on top. You can use diced tomatoes, black olives, or corn. These bright flavors add a nice touch. You can also swap regular cheese for plant-based cheese. Look for brands that melt well to keep the creamy texture. If you love meat, bacon bits are a great choice. They add a salty crunch. You can also use ground beef for a heartier snack. For extra heat, mix in spicy sausage or add jalapeños to the meat. These options make a bold flavor that hits the spot. For gluten-free options, make sure to use gluten-free tortilla chips. You can also skip the chips and add more veggies for crunch. If you want low-carb, use cauliflower instead of potatoes. Bake the cauliflower skins for a tasty base that holds all your toppings perfectly. To keep your loaded nacho cheese potato skins fresh, place them in an airtight container. This helps prevent them from drying out. You can refrigerate them right after they cool. They stay good in the fridge for up to three days. If you want to keep them longer, consider freezing. When reheating, the oven is best. Preheat it to 350°F (175°C). Place the potato skins on a baking sheet and cover them with foil. This keeps them moist. Bake for about 10-15 minutes. If you use a microwave, place them on a plate. Heat in short bursts to avoid sogginess. The goal is to keep the skins crispy. You can freeze potato skins before or after baking. If freezing before, prepare the skins and store them raw. Wrap them well in plastic wrap. For after baking, let them cool completely before freezing. Use a freezer-safe container. To defrost, place them in the fridge overnight. Then, reheat in the oven for best results. Yes, you can prepare these potato skins in advance. Bake the potatoes and scoop out the flesh. Then, season and brush the skins with olive oil. Place them on a baking sheet and store them in the fridge. When ready to serve, add cheese and jalapeños, and bake until melted. This way, you save time during your gathering. If you want an alternative base, try using zucchini or eggplant. Both can hold toppings well. Just slice them thick enough to scoop out some flesh. Bake them until tender, then load them with cheese and toppings. It's a fun twist on the classic recipe. To avoid burning the cheese, layer it on the skins after some baking. Bake the skins first until crispy. Then, add your cheese. Keep an eye on them and remove them as soon as the cheese is melted. A lower oven temperature can also help keep the cheese gooey. Yes, sweet potatoes can work nicely for a different flavor. They add a hint of sweetness. Keep in mind, sweet potatoes may cook faster than russets. Check them often to ensure they don’t get too soft. The texture will be a bit creamier than regular potato skins, but still delicious! This blog post detailed how to create delicious loaded nacho cheese potato skins. We covered the main ingredients, baking steps, and how to achieve crispy skins. I offered tips on cheese choices, common mistakes, and variations for different diets. Remember to store leftovers properly for later enjoyment. Each step helps you perfect this dish. With these tips, you can impress your family or friends. You’ll enjoy every cheesy bite. Now, get cooking and savor these tasty treats!

Ingredients

Main Ingredients List

– 4 large russet potatoes

– 1 cup shredded cheddar cheese

– 1 cup shredded Monterey Jack cheese

– 1/2 cup sour cream

– 1/2 cup sliced jalapeños (pickled or fresh)

Seasoning and Garnishes

– 1/4 cup chopped green onions

– 1/2 teaspoon garlic powder

– 1/2 teaspoon smoked paprika

– Salt and pepper to taste

– Olive oil for brushing

– Crumbled tortilla chips (for garnish)

The key to great loaded nacho cheese potato skins lies in fresh ingredients. Start with large russet potatoes. They have a thick skin, perfect for holding toppings.

Use a mix of cheddar and Monterey Jack cheeses. Cheddar gives sharpness, while Monterey Jack melts beautifully. Sliced jalapeños add heat and flavor. Choose pickled for tanginess or fresh for more spice.

Don’t skip sour cream; it cools the heat from the jalapeños. Green onions add color and a fresh taste. The garlic powder and smoked paprika will deepen the flavor.

Finally, season with salt and pepper. Brush the skins with olive oil for extra crispness. Crumbled tortilla chips on top provide a nice crunch.

With these ingredients, your potato skins will be loaded with flavor and texture.

Step-by-Step Instructions

Preparation Steps

– Preheat the oven to 400°F (200°C).

– Scrub and prepare the russet potatoes. This helps remove dirt and makes them ready for baking.

Baking the Potatoes

– Bake the potatoes until tender. This usually takes about 45-60 minutes.

– Cool and cut the potatoes lengthwise. Wait until they are cool enough to handle safely.

Preparing the Skins

– Scoop out the potato flesh, leaving a 1/4-inch border. You can save the flesh for mashed potatoes or soups.

– Brush the skins with olive oil. Sprinkle salt, pepper, garlic powder, and smoked paprika on top. This adds great flavor.

Loading the Skins

– Layer the skins with shredded cheddar cheese first. Next, add Monterey Jack cheese and jalapeños.

– Bake the loaded skins for 5-7 more minutes until the cheese is melted and bubbly. This step brings everything together.

Serving Suggestions

– Top each skin with a dollop of sour cream. Add chopped green onions and a sprinkle of crumbled tortilla chips for crunch. Enjoy each bite warm and full of flavor!

Tips & Tricks

How to Achieve Perfectly Crispy Skins

To get crispy potato skins, start with the right baking technique. First, bake the russet potatoes at 400°F (200°C). This high heat helps them crisp up nicely. Pierce each potato with a fork. This allows steam to escape and prevents sogginess. After baking, let them cool slightly. Then, scoop out the flesh, leaving a thin layer. Brush the skins with olive oil for added crispiness. Season with salt, pepper, garlic powder, and smoked paprika. Proper seasoning is crucial; it enhances the flavor of the skins.

Recommended Cheese Choices

When it comes to cheese, I love using a mix for great flavor. Cheddar and Monterey Jack are a classic combo. Cheddar adds sharpness, while Monterey Jack melts beautifully. You can also try pepper jack for a spicy kick. If you want alternatives, consider gouda or fontina. These cheeses melt well and add unique flavors. Mixing cheeses gives your loaded nacho cheese potato skins depth and excitement.

Avoiding Common Mistakes

Many people overcook the potatoes. This can lead to mushy skins. Bake them just until tender, not falling apart. Also, don’t skip the seasoning. Without enough salt and spices, your skins can taste bland. So, taste as you go! A little extra seasoning can make a big difference in flavor. Pay attention to these tips to enjoy perfect loaded nacho cheese potato skins every time!

Variations

Vegetarian Options

For a tasty vegetarian twist, try adding fresh veggies on top. You can use diced tomatoes, black olives, or corn. These bright flavors add a nice touch. You can also swap regular cheese for plant-based cheese. Look for brands that melt well to keep the creamy texture.

Meat Lovers

If you love meat, bacon bits are a great choice. They add a salty crunch. You can also use ground beef for a heartier snack. For extra heat, mix in spicy sausage or add jalapeños to the meat. These options make a bold flavor that hits the spot.

Dietary Adjustments

For gluten-free options, make sure to use gluten-free tortilla chips. You can also skip the chips and add more veggies for crunch. If you want low-carb, use cauliflower instead of potatoes. Bake the cauliflower skins for a tasty base that holds all your toppings perfectly.

Storage Information

How to Store Leftovers

To keep your loaded nacho cheese potato skins fresh, place them in an airtight container. This helps prevent them from drying out. You can refrigerate them right after they cool. They stay good in the fridge for up to three days. If you want to keep them longer, consider freezing.

Reheating Tips

When reheating, the oven is best. Preheat it to 350°F (175°C). Place the potato skins on a baking sheet and cover them with foil. This keeps them moist. Bake for about 10-15 minutes. If you use a microwave, place them on a plate. Heat in short bursts to avoid sogginess. The goal is to keep the skins crispy.

Freezing Instructions

You can freeze potato skins before or after baking. If freezing before, prepare the skins and store them raw. Wrap them well in plastic wrap. For after baking, let them cool completely before freezing. Use a freezer-safe container. To defrost, place them in the fridge overnight. Then, reheat in the oven for best results.

FAQs

Can I make Loaded Nacho Cheese Potato Skins ahead of time?

Yes, you can prepare these potato skins in advance. Bake the potatoes and scoop out the flesh. Then, season and brush the skins with olive oil. Place them on a baking sheet and store them in the fridge. When ready to serve, add cheese and jalapeños, and bake until melted. This way, you save time during your gathering.

What can I substitute for potatoes?

If you want an alternative base, try using zucchini or eggplant. Both can hold toppings well. Just slice them thick enough to scoop out some flesh. Bake them until tender, then load them with cheese and toppings. It’s a fun twist on the classic recipe.

How do I ensure the cheese doesn’t burn?

To avoid burning the cheese, layer it on the skins after some baking. Bake the skins first until crispy. Then, add your cheese. Keep an eye on them and remove them as soon as the cheese is melted. A lower oven temperature can also help keep the cheese gooey.

Can I use sweet potatoes instead?

Yes, sweet potatoes can work nicely for a different flavor. They add a hint of sweetness. Keep in mind, sweet potatoes may cook faster than russets. Check them often to ensure they don’t get too soft. The texture will be a bit creamier than regular potato skins, but still delicious!

This blog post detailed how to create delicious loaded nacho cheese potato skins. We covered the main ingredients, baking steps, and how to achieve crispy skins. I offered tips on cheese choices, common mistakes, and variations for different diets. Remember to store leftovers properly for later enjoyment. Each step helps you perfect this dish. With these tips, you can impress your family or friends. You’ll enjoy every cheesy bite. Now, get cooking and savor these tasty treats!

- 4 large russet potatoes - 1 cup shredded cheddar cheese - 1 cup shredded Monterey Jack cheese - 1/2 cup sour cream - 1/2 cup sliced jalapeños (pickled or fresh) - 1/4 cup chopped green onions - 1/2 teaspoon garlic powder - 1/2 teaspoon smoked paprika - Salt and pepper to taste - Olive oil for brushing - Crumbled tortilla chips (for garnish) The key to great loaded nacho cheese potato skins lies in fresh ingredients. Start with large russet potatoes. They have a thick skin, perfect for holding toppings. Use a mix of cheddar and Monterey Jack cheeses. Cheddar gives sharpness, while Monterey Jack melts beautifully. Sliced jalapeños add heat and flavor. Choose pickled for tanginess or fresh for more spice. Don't skip sour cream; it cools the heat from the jalapeños. Green onions add color and a fresh taste. The garlic powder and smoked paprika will deepen the flavor. Finally, season with salt and pepper. Brush the skins with olive oil for extra crispness. Crumbled tortilla chips on top provide a nice crunch. With these ingredients, your potato skins will be loaded with flavor and texture. - Preheat the oven to 400°F (200°C). - Scrub and prepare the russet potatoes. This helps remove dirt and makes them ready for baking. - Bake the potatoes until tender. This usually takes about 45-60 minutes. - Cool and cut the potatoes lengthwise. Wait until they are cool enough to handle safely. - Scoop out the potato flesh, leaving a 1/4-inch border. You can save the flesh for mashed potatoes or soups. - Brush the skins with olive oil. Sprinkle salt, pepper, garlic powder, and smoked paprika on top. This adds great flavor. - Layer the skins with shredded cheddar cheese first. Next, add Monterey Jack cheese and jalapeños. - Bake the loaded skins for 5-7 more minutes until the cheese is melted and bubbly. This step brings everything together. - Top each skin with a dollop of sour cream. Add chopped green onions and a sprinkle of crumbled tortilla chips for crunch. Enjoy each bite warm and full of flavor! To get crispy potato skins, start with the right baking technique. First, bake the russet potatoes at 400°F (200°C). This high heat helps them crisp up nicely. Pierce each potato with a fork. This allows steam to escape and prevents sogginess. After baking, let them cool slightly. Then, scoop out the flesh, leaving a thin layer. Brush the skins with olive oil for added crispiness. Season with salt, pepper, garlic powder, and smoked paprika. Proper seasoning is crucial; it enhances the flavor of the skins. When it comes to cheese, I love using a mix for great flavor. Cheddar and Monterey Jack are a classic combo. Cheddar adds sharpness, while Monterey Jack melts beautifully. You can also try pepper jack for a spicy kick. If you want alternatives, consider gouda or fontina. These cheeses melt well and add unique flavors. Mixing cheeses gives your loaded nacho cheese potato skins depth and excitement. Many people overcook the potatoes. This can lead to mushy skins. Bake them just until tender, not falling apart. Also, don’t skip the seasoning. Without enough salt and spices, your skins can taste bland. So, taste as you go! A little extra seasoning can make a big difference in flavor. Pay attention to these tips to enjoy perfect loaded nacho cheese potato skins every time! {{image_2}} For a tasty vegetarian twist, try adding fresh veggies on top. You can use diced tomatoes, black olives, or corn. These bright flavors add a nice touch. You can also swap regular cheese for plant-based cheese. Look for brands that melt well to keep the creamy texture. If you love meat, bacon bits are a great choice. They add a salty crunch. You can also use ground beef for a heartier snack. For extra heat, mix in spicy sausage or add jalapeños to the meat. These options make a bold flavor that hits the spot. For gluten-free options, make sure to use gluten-free tortilla chips. You can also skip the chips and add more veggies for crunch. If you want low-carb, use cauliflower instead of potatoes. Bake the cauliflower skins for a tasty base that holds all your toppings perfectly. To keep your loaded nacho cheese potato skins fresh, place them in an airtight container. This helps prevent them from drying out. You can refrigerate them right after they cool. They stay good in the fridge for up to three days. If you want to keep them longer, consider freezing. When reheating, the oven is best. Preheat it to 350°F (175°C). Place the potato skins on a baking sheet and cover them with foil. This keeps them moist. Bake for about 10-15 minutes. If you use a microwave, place them on a plate. Heat in short bursts to avoid sogginess. The goal is to keep the skins crispy. You can freeze potato skins before or after baking. If freezing before, prepare the skins and store them raw. Wrap them well in plastic wrap. For after baking, let them cool completely before freezing. Use a freezer-safe container. To defrost, place them in the fridge overnight. Then, reheat in the oven for best results. Yes, you can prepare these potato skins in advance. Bake the potatoes and scoop out the flesh. Then, season and brush the skins with olive oil. Place them on a baking sheet and store them in the fridge. When ready to serve, add cheese and jalapeños, and bake until melted. This way, you save time during your gathering. If you want an alternative base, try using zucchini or eggplant. Both can hold toppings well. Just slice them thick enough to scoop out some flesh. Bake them until tender, then load them with cheese and toppings. It's a fun twist on the classic recipe. To avoid burning the cheese, layer it on the skins after some baking. Bake the skins first until crispy. Then, add your cheese. Keep an eye on them and remove them as soon as the cheese is melted. A lower oven temperature can also help keep the cheese gooey. Yes, sweet potatoes can work nicely for a different flavor. They add a hint of sweetness. Keep in mind, sweet potatoes may cook faster than russets. Check them often to ensure they don’t get too soft. The texture will be a bit creamier than regular potato skins, but still delicious! This blog post detailed how to create delicious loaded nacho cheese potato skins. We covered the main ingredients, baking steps, and how to achieve crispy skins. I offered tips on cheese choices, common mistakes, and variations for different diets. Remember to store leftovers properly for later enjoyment. Each step helps you perfect this dish. With these tips, you can impress your family or friends. You’ll enjoy every cheesy bite. Now, get cooking and savor these tasty treats!

Loaded Nacho Cheese Potato Skins

Indulge in the ultimate party treat with these loaded nacho cheese potato skins! Made with crispy russet potatoes and topped with gooey cheddar and Monterey Jack cheese, jalapeños, and a zesty dollop of sour cream, this recipe is a must-try for any snack lover. Perfect for game day or a cozy night in, these delicious bites will impress your guests. Click to explore the full recipe and elevate your snack game today!

Ingredients
  

4 large russet potatoes

1 cup shredded cheddar cheese

1 cup shredded Monterey Jack cheese

1/2 cup sour cream

1/2 cup sliced jalapeños (pickled or fresh)

1/4 cup chopped green onions

1/2 teaspoon garlic powder

1/2 teaspoon smoked paprika

Salt and pepper to taste

Olive oil for brushing

Crumbled tortilla chips (for garnish)

Instructions
 

Preheat your oven to 400°F (200°C).

    Scrub the russet potatoes under cold water and pat them dry with a paper towel. Pierce each potato multiple times with a fork and place them directly on the oven rack. Bake for about 45-60 minutes, or until tender when pierced with a knife.

      Once baked, remove the potatoes and let them cool slightly. When cool enough to handle, cut each potato in half lengthwise and scoop out most of the flesh, leaving about a 1/4-inch border to hold the shape. Reserve the potato flesh for another use (like mashed potatoes!).

        Brush the potato skins with olive oil and sprinkle with salt, pepper, garlic powder, and smoked paprika. Place them on a baking sheet with the skin side down.

          Bake the potato skins in the oven for an additional 10-15 minutes until edges are crispy and the skins are golden.

            Remove the skins from the oven and layer the bottom with shredded cheddar cheese, followed by Monterey Jack cheese and sliced jalapeños. Return the loaded skins to the oven for 5-7 more minutes, or until the cheese is melted and bubbly.

              Remove from the oven and let cool for a couple of minutes. Top each potato skin with a dollop of sour cream, chopped green onions, and a sprinkle of crumbled tortilla chips for crunch.

                Serve warm and enjoy your loaded nacho cheese potato skins!

                  Prep Time: 15 minutes | Total Time: 1 hour 15 minutes | Servings: 8